
Making your own homemade lotion can be a rewarding experience, especially with this simple non-greasy shea butter lotion recipe. It’s crafted using enriching ingredients, providing a luxurious feel akin to store-bought lotions.
I’m genuinely enthusiastic about handmade lotions. Using them daily keeps my skin wonderfully smooth, hydrated, and radiant, a clear step above store-bought counterparts. Unlike commercial lotions that contain minimal natural emollient oils amidst various fillers, handmade lotions are rich in skin-friendly oils and butters.
Differentiating between body lotion and body butter is essential. Misnaming these products often leads to unsatisfactory outcomes and misunderstandings for crafters seeking the right recipes.
Creating Handmade Lotion: A Simple Process
Handmade lotion tops my list of favorite DIY skincare products to create – even surpassing soap or body scrubs. The process is straightforward, allowing you to whip up a batch quickly, and once cooled, it’s ready for immediate use.
Lotion is an emulsification of oils and water, two elements that don’t typically blend easily. For crafting lotion, you’ll require a few specialized ingredients not needed for body butters. But don’t fret; these elements are readily available from cosmetic suppliers and come at affordable prices.
Core ingredients:
To create a basic body lotion, you’ll need four core ingredients:
- Water
- Oils and/or butters
- An emulsifier
- A preservative
Water: The Foundation of Your Lotion
Water serves as the primary component of your lotion recipe. Contrary to the misconception that water dilutes the product, it’s actually vital for skin hydration. Skin cells need moisture to maintain a plump, smooth appearance. Including water in your lotion formulation isn’t about filling space; it’s about providing essential moisture to the skin.
Oils and Butters: Nourishing Ingredients
Oils and butters constitute the mainstay of your lotion. These emollient and occlusive ingredients seal in the moisture delivered by water, leaving the skin feeling soft and supple. There’s a wide range of options available, each offering distinct properties. Some favorites include sweet almond oil, hemp seed oil, mango butter, shea butter, and coconut oil.
Emulsifiers: The Secret Ingredient
Emulsifiers play a crucial role in ensuring the uniform suspension of oils in water, a key aspect for creating professional-quality lotions. Emulsifying wax NF stands out as the most common and beginner-friendly emulsifier. Unlike substitutes like beeswax or carnuba wax, emulsifying wax guarantees optimal blending of oils and water in lotions.
Preservatives: Ensuring Lotion Safety
As water fosters microbial growth, a preservative is vital to prevent contamination and maintain the lotion’s safety. Natural preservatives exist but may pose challenges in efficacy and pH stability. For beginners, synthetic preservatives like Liquid Germall Plus offer broad-spectrum protection against mold, yeast, and bacteria.
HOW TO MAKE shea butter lotion -STEP BY STEP PROCESS
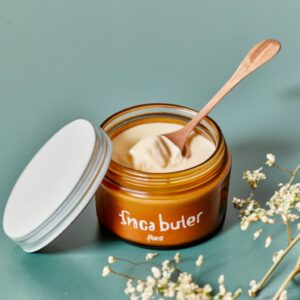
Ready to dive into creating your homemade lotion? This non-greasy shea butter lotion recipe strikes the perfect balance – creamy yet fast-absorbing, offering deep skin nourishment.
Shea butter, rich and protective, works wonders in locking in moisture, while coconut oil contributes a lighter feel, balancing the richness of shea. Once you experience this nourishing, easy-to-make lotion, there’s no turning back to store-bought options.
Non-Greasy Shea Butter Lotion Recipe:
This recipe yields 16 ounces, enough for 4 (4 ounce) jars. All ingredients are weighed, not measured by volume.
Ingredients:
- 2.4 oz coconut oil
- 0.8 oz shea butter
- 0.8 oz emulsifying wax
- 11.2 oz distilled water
- 0.08 oz liquid Germall Plus preservative
Additional Items:
- Digital scale
- Container for ingredient weighing
- Small saucepan or water bath
- Silicone spatula or spoon
- Immersion blender
- Jars or containers for storing the lotion
Prep Tip: Sanitize all tools thoroughly by washing with hot, soapy water or running through a dishwasher cycle.
Step 1: Weigh coconut oil, shea butter, emulsifying wax, and water into a saucepan or water bath.
Step 2: Gently heat the mixture over low heat until the emulsifying wax fully melts. Remove from heat.
Step 3: Use the immersion blender to blend the mixture until well-emulsified, thickening slightly as it cools.
Note: Avoid continuous whipping to prevent the immersion blender from overheating. Briefly whip for about 30 seconds, pause, stir, and repeat.
Step 4: Allow the mixture to cool completely. Optionally, use the immersion blender intermittently for the first hour to promote a stable emulsion and expedite cooling.
Step 5: Once the lotion has cooled, add the liquid Germall Plus preservative.
- Blend thoroughly using the immersion blender, occasionally scraping the sides with a spatula for complete incorporation.
- If the lotion becomes too thick for the immersion blender, stir vigorously by hand until well combined.
- Transfer the lotion into jars or containers, seal them, and your homemade lotion is now ready for use!
- Shelf Life: Properly preserved, homemade lotions last about 8-12 months. Label and use before the expiry date.
Interested in diving deeper into the art of crafting lotions at home? Consider exploring my online course, ‘Handmade Lotion for Beginners.’ This comprehensive course equips you with the skills to create ultra-moisturizing, non-greasy body lotions that surpass store-bought options.
The course comprises quick, simple tutorials perfect for beginners, guiding you through making skincare products at home. Step into my online schoolhouse and embark on this exciting journey!”
Benefits of Shea Butter in Lotions

Shea butter, extracted from the nuts of the African shea tree, is a revered natural ingredient known for its remarkable benefits for the skin. When incorporated into lotions, shea butter offers a plethora of advantages that promote skin health and vitality.
Exceptional Moisturizing Properties:
Shea butter is deeply hydrating, making it a superb emollient. It penetrates the skin easily, locking in moisture without leaving a greasy residue. This quality is especially beneficial for individuals with dry or dehydrated skin, offering long-lasting hydration.
Nourishment and Softening:
Rich in essential fatty acids and vitamins (A, E, and F), shea butter nourishes the skin deeply. It aids in restoring elasticity, smoothing rough patches, and enhancing the skin’s suppleness, leaving it soft and revitalized.
Soothes and Calms Irritation:
Its anti-inflammatory and anti-aging properties make shea butter a soothing agent for irritated or sensitive skin. It helps alleviate itching, redness, and discomfort caused by various skin conditions, including eczema, dermatitis, or sunburn.
Natural Healing Abilities:
Shea butter contains compounds like cinnamic acid, renowned for their healing properties. It assists in repairing damaged skin, reducing the appearance of scars, and promoting a more even skin tone over time.
Protection from Environmental Stress:
The natural antioxidants in shea butter shield the skin from free radicals and environmental stressors. This protective barrier helps in preventing premature aging caused by pollution, UV rays, and harsh weather conditions.
When incorporated into homemade lotions, shea butter elevates the formulation, ensuring that the skin receives ample nourishment, hydration, and care. It’s a versatile and potent natural ingredient that contributes immensely to healthy, glowing skin.
Adding shea butter to your DIY lotions not only enhances their effectiveness but also provides a luxurious, velvety texture that makes the application a delight for the senses.
Tips for Customizing Your Lotion
Creating your own lotion allows for a personalized skincare experience. Here are tips to tailor your lotion and make it uniquely yours:
Scent Sensations with Essential Oils: Experiment with various essential oils to infuse your lotion with delightful scents. Lavender, peppermint, citrus blends, or floral essences not only add aroma but also offer therapeutic benefits. Ensure to research each oil’s dilution ratio for safe usage.
Consistency Tweaks: Adjust the texture of your lotion to suit your preferences. For a lighter feel, increase the water content slightly or reduce the amount of shea butter. Conversely, for a thicker, richer texture, add more shea butter or another preferred butter like cocoa or mango.
Skin-Loving Additions: Enhance the nourishment by incorporating skin-friendly ingredients. Aloe vera gel brings a cooling effect and extra hydration. Vitamin E oil is excellent for its antioxidant properties, aiding in skin repair and maintaining suppleness.
Healing Herbal Infusions: Infuse your oils with herbs like calendula, chamomile, or comfrey before adding them to your lotion recipe. These herbs have soothing and healing properties, perfect for sensitive or irritated skin.
Test and Tweak: Start with small batches when experimenting with customizations. This allows you to test the fragrance, consistency, or added ingredients without wasting larger quantities. Keep a record of the changes made to replicate successful formulations.
Layering Scents: Combine different essential oils for unique fragrances. Blend lavender with a citrus note like bergamot or lime for a refreshing aroma. Experiment with mixing scents to create your signature blend.
Stay Informed: Always research the properties and compatibility of ingredients before incorporating them into your lotion. Some components might not interact well or could cause skin sensitivities if not used correctly.
customizable ideas for shea butter lotion
| Customization Idea | Description |
|---|---|
| Essential Oils | Add a few drops of essential oils like lavender, tea tree, or citrus for fragrance. |
| Herbal Infusions | Create infusions with dried herbs like chamomile, calendula, or rosemary for added benefits. |
| Skin-Friendly Additives | Incorporate aloe vera gel, vitamin E oil, or honey for extra nourishment. |
| Adjusting Consistency | Experiment with more or less emulsifying wax or butter to achieve desired thickness. |
| Natural Colorants | Use natural colorants like beetroot powder or turmeric for subtle hues. |
| Specialty Oil Blends | Blend different oils like jojoba, argan, or almond to create a unique oil mixture. |
| Hyaluronic Acid Enhancement | Include hyaluronic acid for added hydration and skin-plumping effects. |
| Scent-Free Options | Opt for unscented lotions for individuals sensitive to fragrances. |
Storage and Usage Tips for Homemade Lotions
Preserving the efficacy and quality of your homemade lotion relies on proper storage and application. Follow these tips to ensure your lotion stays fresh and yields optimal results:
Storage Conditions: Store your lotion in a cool, dry place away from direct sunlight or heat sources. Dark, opaque containers can help preserve the lotion’s integrity by shielding it from light exposure.
Avoid Contamination: Use clean hands or a sanitized spatula to scoop out the lotion to prevent introducing contaminants into the product. Ensure the container is tightly sealed after each use to minimize air exposure.
Shelf Life Awareness: Most homemade lotions, when properly preserved, can typically last between 8 to 12 months. Label your containers with the production date for reference and use within this timeframe.
Application Technique: Apply the lotion onto clean, dry skin. Take a small amount and gently massage it into your skin using circular motions until fully absorbed. Focus on areas prone to dryness, such as elbows, knees, and heels.
Quantity Matters: Start with a modest amount of lotion and add more if needed. Over-application may leave the skin feeling greasy and hinder absorption.
Customize for Seasonal Changes: Adjust your lotion recipe or usage based on seasonal skin needs. In colder months, opt for richer lotions with thicker consistency for added hydration.
Test Before Wider Application: Before using a new lotion extensively, conduct a patch test on a small area of your skin to ensure compatibility and to rule out any allergic reactions.
Consistent Usage: Regular use enhances the lotion’s effectiveness. Apply the lotion daily, ideally after a shower or bath when the skin is most receptive to hydration.
FAQ’S
Can you mix shea butter and olive oil?
Yes, shea butter and olive oil can be mixed together to create a hydrating and nourishing blend for the skin.
What oil can you mix with shea butter for skin?
Several oils work well with shea butter, such as coconut oil, jojoba oil, almond oil, and argan oil, offering additional benefits to the skin.
What is the ratio of shea butter to oil?
The ratio depends on personal preference and the desired consistency. A common starting point is around 2 parts shea butter to 1 part oil, but you can adjust it to suit your needs.
Can I mix coconut oil and shea butter together?
Absolutely, blending coconut oil and shea butter creates a nourishing and moisturizing mixture suitable for skin and hair care.
Which is better for your skin: shea butter or coconut oil?
Both shea butter and coconut oil have their benefits. Shea butter is deeply moisturizing and good for dry skin, while coconut oil is lighter and has antimicrobial properties.
Who should not use shea butter?
Individuals with tree nut allergies should avoid shea butter as it comes from the shea nut.
Which is more moisturizing: shea butter or coconut oil?
Shea butter tends to be more deeply moisturizing and better suited for very dry or rough skin compared to coconut oil.
What is better than shea butter?
For certain skin types or preferences, alternatives to shea butter might include cocoa butter, mango butter, or aloe vera.
Is shea butter better than vaseline?
Shea butter is a natural moisturizer, while Vaseline (petroleum jelly) is an occlusive that forms a barrier on the skin. The choice depends on personal preference and skin needs.
Does shea butter clog pores?
Shea butter is considered non-comedogenic, meaning it’s less likely to clog pores for most people.
Does shea butter clear dark spots?
Shea butter contains vitamins and antioxidants that may help in reducing the appearance of dark spots over time.
Does shea butter help sagging skin?
Shea butter’s moisturizing properties can improve skin elasticity, potentially helping with the appearance of sagging skin.
Does shea butter tighten skin?
It may help in firming and toning the skin due to its hydrating and nourishing effects, but individual results can vary.
Does shea butter boost collagen?
Shea butter contains components like vitamins A and E that may support collagen production but it’s not a direct stimulant.
Can I use shea butter on my private part?
Using shea butter on intimate areas may offer moisturizing benefits, but it’s essential to ensure it doesn’t cause irritation.
Does shea butter tighten breasts?
There’s no scientific evidence that shea butter can tighten breasts.
Does shea butter help with odor?
Shea butter has a natural, mild fragrance and can be used as a base for deodorants, but it’s not a direct odor-fighting solution.
Can shea butter cure yeast infections?
Shea butter is not a cure for yeast infections. It’s important to consult a healthcare professional for appropriate treatment.
Is shea butter good for pubic hair?
Shea butter can provide moisture to pubic hair and skin, offering nourishment and reducing dryness or irritation.
Why does my shea butter smell weird?
Shea butter might have a natural nutty or earthy scent that some people find unusual. Exposure to air or improper storage might also alter its fragrance.
How do I know if my shea butter is bad?
Rancid shea butter may have an off smell, an altered texture, or a change in color.
What does shea butter smell like when it goes bad?
Spoiled shea butter might have a rancid or sour odor, significantly different from its natural nutty aroma.
What color should real shea butter be?
Real shea butter usually ranges from ivory to yellowish or beige in color.
Can bacteria live in shea butter?
Shea butter has natural properties that make it inhospitable to most bacteria, but contamination is possible if introduced through improper handling or storage.
How can you tell good quality shea butter?
Good quality shea butter is typically unrefined, has a natural nutty scent, and a creamy texture.
How do you tell the difference between real and fake shea butter?
Real shea butter is unrefined, has a nutty scent, and varies in color, whereas fake or adulterated versions might lack these characteristics or contain synthetic fragrances. Always buy from reputable sources to ensure authenticity.